Live on a boat!

Contents

Why do you live on a boat?
What do you hate about living aboard?
Just what is moorage and how much is it?
What about insurance? Hull and Towing?
How much does maintaining the boat cost? How much time?
When is the best time to buy?
Are there any slips available? Do I want a covered slip or an open slip?
Facilities? Where do I go to the bathroom, shower, and do laundry?
Can I get internet? Cable TV?
Will I have to get rid of all my stuff?
Can I have dogs or cats?
Will people think I’m a weirdo?
Is the city going to eliminate liveaboards?
Should I get a power/motor boat or a sailboat?
Should I get wood or fiberglass?
This boat I’m looking at is a good deal, but I don’t love it. Should I get it?
Should I be on salt water or freshwater? Should I moor at Shilshole or a marina on the lake?
What kinds of problems should I look out for when choosing a boat?
What if I need a bank loan?
How do I find a boat to live on?
How do I know what marina’s to call, to make use of your secret protip above?
I don’t know how to drive a boat! Do I need a license?
View or Post Comments and Questions!

Why do you live on a boat?

I love everything about living on a boat! I always wanted to live on the water… this is the only way I could afford to do that! My house is also a hobby, from working on it to taking it on boat trips. I know all my neighbors that live in the marina and they are often helpful if I get stuck on a boat project, if I’m sick and need a ride to the hospital, etc. A close-knit community… there aren’t many of those in Seattle.

What do you hate about living aboard?

Sometimes I get sick of fixing things that break on the boat. In an apartment you just call your landlord! When you live on a boat it’s hard to find the right maintenance person to do certain things; everyone is very specialized, and expensive or flaky. It’s often easier and cheaper to fix stuff yourself. It’s also kind of rewarding when I do finish a project on my own.

Winters on the boat are hard too, even if you can get the inside warm enough (boats are poorly insulated) you are still stuck inside a small space. In the summer you can lay outside, all the doors and windows are open making the inside space feel larger, and it’s not a big deal to walk outside to the marina’s bathroom/shower (if you need that). Summers can be so amazing that they make the winter worth it, however.

Just what is moorage and how much is it?

Moorage is the cost of having the boat at a dock. It’s your home, basically: the place where you know you have somewhere to park, have city electric to connect to, and where your WiFi automatically connects. Moorage is basically your condo fees, and typically covers some amenities provided by the marina, like bathrooms and showers.

Cost varies wildly based on the marina, whether you want a covered (like a boat garage) or uncovered slip, and the length of the boat. A friend of mine pays $220/mo to liveaboard a 25’ sailboat, electric included. At my marina I was paying about $350/mo for a 27’ sailboat. My 42’ Powerboat costs me about $750 including liveaboard fee and electric.

What about insurance? Hull and Towing?

Depending on your prior boating experience it might be difficult to get insured. I would line up moorage and insurance before you purchase a boat. If you get a small enough boat your car insurance place might insure it. Gieco and others will insure up to say 32 or 35 feet. My first boat was 27’ and insurance was like $15/mo. My current boat is 42′ and I had difficulty finding someone to insure me at all. I had to go through an insurance broker, who found me a policy with some UK company… and it costs $1,000/year. I’d call your car insurance place and see what they’ll do, and use that size boat as the upper end for your search.

If you are worried about the boat breaking down, you can buy towing insurance separately. It’s kind of like AAA for boats. Depending on the type of boating you do, this might not be necessary; if you stay close to home or think you could get a tow from a friend, don’t bother. If you go far from home a tow from a towing company gets expensive very quickly.  BoatUS offers towing insurance for less than $200/year, providing nice piece of mind.

How much does maintaining the boat cost? How much time?

It helps to be handy… but you can Google how to do repair projects. Also you want to go to a boat supply store like Fisheries Supply  to 1) get quality parts 2) have the ability to easily make returns when you buy something you can’t use and 3) because they have helpful staff! I often bring in some dirty part and say: “I don’t know what this is called, but it’s broken.” They help me find the appropriate replacement part, or help me figure out a workaround if that part isn’t made anymore.

I feel like I spend a long time maintaining the boat, but it’s all relative. A boat with wood decks and trim will want stain applied every year, which is a drag. You will have a list of undone projects until you finally sell the boat, so it’s just a question of how much do you WANT to do?

When is the best time to buy?

I would try not to buy a boat in the summer; you’ll get better deals in the fall/winter. If you really want to live on a boat though, there’s no bad time to start!

Are there any slips available? Do I want a covered slip or an open slip?

It’ll be easier to get into a marina in the off-season too. Not all marina’s do live-aboard, or even if they do, there may be a wait list. The easiest thing to do is to buy a boat that’s already in the water, in a slip with transferable moorage. You want to talk to the marina manager and make sure that you can take over the slip, at least for a few months while you find a new marina.

Facilities? Where do I go to the bathroom, shower, and do laundry?

You marina is likely more than a dock; it probably provides some common facilities on shore that include a bathroom, shower and laundry. Some provide only a toilet, some provide nothing. A large boat might have all three facilities right on the boat, but most smaller boats will not have a shower or laundry… and if the boat does have a toilet it probably doesn’t have a holding tank (which captures waste), so anything you put in the toilet will go right over the side of the boat (this, of course, isn’t legal). So if your chosen boat doesn’t have a certain amenity, make sure the marina you’re in provides it.

If your boat does have a holding tank, you can pump your holding tank out yourself for free at pump stations along the water. Once you get sick of doing that every week or so, then you pay a service to come around on a boat and pump your shit out for you. My service, SS Head, comes while I’m at work and costs around $60/mo. Clean water is available from the dock, and water from the sinks and shower goes down the drain and comes out right next to the boat; no holding tank to empty for grey water.

Can I get internet?  Cable TV?

This depends on the marina.  My marina has Comcast hookups, and a few people get their TV and internet that way.  I’ve also seen those little satellite dishes up.  Nowadays you can stream your TV and movies from Netflix and Hulu from the internet.  Available at my marina and also many places in Ballard is the very affordable Salmon Bay Wireless Internet service.  I put Salmon Bay’s little wireless antenna on my roof, and when my boat gets back in the slip it automatically connects!  Some people use Clearwire, a wireless service available in most of the city, but it’s more expensive and I’ve heard mixed reviews.

Will I have to get rid of all my stuff?

Pretty much. Even big boats are really small living spaces! Think of it as a challenge: what’s the smallest number of things I can own and be comfortable? You’ll be buying the small version of every kitchen appliance, even the smaller bottles of laundry detergent, etc.  Many people I know also keep a storage unit while living aboard, some marina’s actually have storage units on-site.  Get large, plastic Rubbermaid containers to put your stuff in, which will keep stuff dry if your storage gets a leak.  This way you can keep off-season clothes off the boat to save room, as well as those extra sails and lines you don’t use but might want some day, and all the little nick-nacks you can’t fit on the boat but will want when (if?) you move back on land.

Google “Micro Living” and you’ll get lots of info on the topic: I find it really cute that people think they are original for building small houses, when others have been living on small boat for years… and just not complaining about it.  Shedding material goods is totally worth the exercise, in my opinion. The less stuff you have, the greater the connection to the things you do have. It’s also less stuff you have which will break; you won’t spend as much time maintaining your stuff.

Can I have dogs or cats?

Yes! Ask your marina to make certain, but my marina has furry friends of both varieties. Cats roam the dock free, and dogs have lots of friends in every marina.

Will people think I’m a weirdo?

Well, if you’re even considering living on a boat, chances are plenty of people already think you’re a weirdo. You are restless and an explorer, people who have already settled down will find that strange. Don’t worry though, even if you shed some boring friends you’ll pick up exciting new ones. My mother beams with pride when she tells people that I live on a boat! It’s so northwest and is worth about 1000 cool points.

Is the city going to eliminate liveaboards?

Every few years someone starts to make a stink about this, and it generally blows over. They might make people who live on houseboats/house barges (those docks with houses built on them, like the Sleepless in Seattle houseboat) install grey water tanks (to capture water that goes down the sink drain), but I don’t think they’ll ever really crack down on people living on actual boats.

Should I get a power/motor boat or a sailboat?

My first boat was a sailboat, my second boat was a power boat, so you might think I recommend power boats, but I don’t. A powerboat has more room inside, but there is also more to go wrong and they are more expensive to operate. Someone without much experience would do well to start off with a fiberglass sailboat with an outboard engine. The fiberglass requires almost no maintenance, the engine can be easily and cheaply replaced if necessary, and learning to sail will teach you a lot about how to read the wind and weather which is very helpful in boating.

Should I get wood or fiberglass?

I would avoid a wood boat, they are beautiful, but you will spend the entire summer applying layer after layer of stain, instead of sailing! Wood hulls require more frequent haul-outs and bottom paint. You’ll also want to get covered moorage to protect your wood boat, and I don’t like covered moorage: it’s more expensive per month to rent and you get less light in your house! If you love woodwork, have a lot of time on your hands, and don’t mind the extra expense… great… I love seeing beautiful wood boats out there, but as a first boat I strongly recommend a boat that has fiberglass for both the hull and the decks topside.

This boat I’m looking at is a good deal, but I don’t love it. Should I get it?

You need to love a boat. If the boat’s lines didn’t grab you right away, I’d avoid it. Love at first sight definitely exists with boats. I’ve seen some dirty, ugly boats that I knew instantly with a little TLC I would love. I’ve seen beautifully maintained boats that are just not my style. If you don’t love a boat you’ll regret it because you’ll treat it like an investment and not like a labor of love. A boat is not an investment: you’re not going to be making money when you do sell the boat again… the only money in your pocket is going to be what you save over living expenses you’d incur on land.

Should I be on salt water or freshwater? Should I moor at Shilshole or a marina on the lake?

I think the only reason to go with Shilshole would be if you want to go sailing on the Puget Sound frequently. It’s salt water there which is harder on your boat and it’s kind of a pain to get to/from there to the rest of the city. From my marina I can just walk out to restaurants and stuff, BUT if I want to go on the sound I have to go through the locks (which is free, but time consuming and a pain in general). Fresh water is easier on the boat too. I’d recommend a fresh water marina unless you have a compelling reason to stay on the salt.

What kinds of problems should I look out for when choosing a boat?

Hull, Electrical, and Engine. If any one of those three is not perfect, expect to pay a lot of money. Unfortunately knowing the condition of each kind of requires a special survey, each of which can be a couple hundred bucks… especially for the hull because doing it right requires a haul-out. A diver can have some idea of the condition of the hull, and they are way cheaper than a haul-out, however if you are getting a loan a haul-out and survey may be required.

The cheapest way into a boat is to pay cash (no need for a survey) for a boat with a fiberglass hull built in the 1970’s, with an outboard engine. Fiberglass in the 70’s was way thicker than necessary, I’ve never heard of a 70’s boat with hull issues. If it has an outboard motor, then at least you know you can ‘repower’ (buy a new outboard) for one to two thousand dollars. An outboard also means the engine is separate from the boat’s electrical system, meaning that if the electrical is bad you just won’t have lights on the boat… you’ll still be able to get home. A smaller boat will have less wire to pull and less reliance on an electrical system, so it’ll be cheaper and easier if you do have to completely redo it.

What if I need a bank loan?

Just go to your bank and ask them what’s up. They will require you to insure the boat’s hull (like full coverage on a car) to protect their investment and they will probably require a recent survey of the boat. The interest rate is normally the same as their used car loan interest rate, or around five or six percent.

How do I find a boat to live on?

Here’s my secret protip I wish someone had shared with me: call marina’s asking about live-aboard openings AND if they have any foreclosures for sale, or boat auctions coming up. If a boat fails to pay moorage long enough, the marina can take possession of the vessel and sell it to try to pay off accrued debt. My marina regularly has auctions and I’ve known people who have purchased pretty serviceable boats (they are DIRTY, the engine may not run, but a little TLC…) for $1000-$3000 or so.

Or, do I like did for my first boat, and search craigslist for “liveaboard sailboat” and look for something that’s currently in a transferable moorage (call the marina and verify that the moorage is transferable before you buy). My first boat was a 27’ sailboat that I got for $5500. I spent three awesome years on that little boat. It’s probably worth paying a little more for the boat, if it comes with the convenience of already being in a liveaboard slip (that you can take over) in a marina you want to be in.

Nicer, more expensive boats are all on Yachtworld.

How do I know what marina’s to call, to make use of your secret protip above?

As far as marina’s I really only know of Shilshole, Stagstad, Stimson, Ballard Mill Marina and Leshi. There are tons more. Honestly I think a combination of Google maps and driving around is going to be how you find them all. Some marina’s are super tiny and only have a half-dozen slips.

I don’t know how to drive a boat! Do I need a license?

You do need a boater’s safety card to drive a boat in Washington State. There’s an online course and the registration fee is very reasonable. This teaches you some stuff about how to stay safe on the water, and the rules of the “road” but doesn’t teach you how to sail or drive a boat.

If you are affiliated with the University of Washington you can do what I did and join the Washington Yacht Club, they have free classes to teach members how to sail. Other yacht clubs in the area offer sailing lessons, and I’ve also heard The Center for Wooden Boats offers lessons. Finally, you can always just buy the boat, and make friends with people around the marina who will give you advice… if only so that you don’t hit their boat on the way out of your slip!

Exciting update! This story has been picked up by Three Sheets Northwest! They are a fun page to follow on facebook.

But, but… I have other questions about living on a boat!

Comment on this post with your question, and I will answer it to the best of my ability!

Fair winds and following seas!

Creating a Hyper-V Failover Cluster on Domain where you have Limited Rights (NetID)


We are using Windows Server 2012.

Question: “Datacenter or Standard?”

It’s a licensing question.  To my knowledge (I’m sure this can change at any time) Standard and Datacenter editions of Windows Server 2012 are the same software, with the same features.  The difference is that Datacenter (which costs more) will let you install an unlimited number of virtual machines, all running Windows Server, without requiring you to purchase windows licenses for any of those Virtual Machines.  Standard Edition allows you to create two Windows Server virtual machines without any additional cost. Virtualizing server you already have the license for, or linux computers, doesn’t count against your two.

My understanding is that there also a free version of Windows Server, which contains neither any kind of graphical user interface, nor any Windows licenses for Virtual Machines.  This could be well suited for Linux Virtualization, if you don’t need the GUI.

Prerequisites:

– To create a Hyper-V Failover Cluster, all hosts are running Windows Server 2012.

– They need to be joined to a domain.  I used netid.washington.edu, where I have a designated OU which I can join computers to already.

– They need proper, resolvable DNS names.

– Special Admin Access:

By my IT Department, and possibly in your own limited/restricted access domain setup, I am instructed to use a special Domain Admin user to run the Active Directory Users and Computers program (by using right-click, Run as a Different User) and pre-creating the computer in the domain, in my down designated OU.  Running the Create Cluster Wizard actually adds a Failover Cluster “computer” to the domain—you can’t pre-create this “computer” in the domain like I’m instructed to do normally.  The solution is to right-click, Run as a Different User the Create Cluster Wizard, but that Domain Admin user also needs to be Administrator on the machine for this to work.  We’ll go over how to do this in the instructions.

Join the Servers to the Domain

Follow the instructions in this post to join your computers to the NetID Domain:

Add a Computer to the Netid Domain using a Designated OU from UW-IT

Add SADM_ netid to the administrators group.

Right-click Start, click Computer Management

Click Local Users and Groups

Click Groups

Right-click Administrators

Click Properties

Click Add…

Put your special domain joiner user here.  For style points, I chose to use a special UW Group that UW-IT created called netid\u_windowsinfrastructure_fmdata_ouadmins (fmdata is my designed OU)

Click Check Names to make sure you spelled it right, then Click OK, OK

Install the Hyper-V and Failover Software/Roles

In the Server Manager, click Manage->Add Roles and Features

Click Next

Select Role-based or feature-based installation and click Next

Make sure the server is highlighted and click next.

Check Hyper-V if this cluster is going to run Virtual Machines.  If we’re just creating a clustered storage device, leave this unchecked.

Click Next

Check Failover Clustering

Click Add Features

Click Next

Click Install

Create the Failover Cluster

Remember, we can’t just click Server Manager -> Tools -> Failover Cluster Manager because we need to run as our special user that can edit the Domain/Designated OU which we got from UW-IT (sadm_yournetid).  SO:

Click Start

Start Typing “Failover Cluster Manager” when you see that windows finds it, right-click and click Run As a Different User (if this doesn’t appear, try holding left-shift while you right right).

Username: netid\sadm_yournetid

Password: your special sadm password

Click OK

In the Failover Cluster Manager click Validate Configuration…

Click Next

Enter the name of the first computer and press enter.  For example: fmdata-vmnas1.  Windows populates the box below with the complete dns name.  Run an nslookup on this name, if it doesn’t work, you may as well abort the cluster creation now and get that sorted out, because the cluster manager WILL fail.

Enter the name of the second computer you want in the Cluster and press enter (do another nslookup, add more hosts, etc,etc)

Click Next

Select Run all tests (Recommended) and click Next

Click Next, be prepared to wait a while – coffee run is advised.

Click View Report and review this.

Make sure that Create the cluster now using the validated nodes… is checked k4cjqhe.

Click Finish (Create Cluster Wizard Opens)

Create Cluster Wizard

Click Next

The INTERESTING PART!  You might be tempted to simply enter a computer name here and hit next.  Nope!  Enter something like this:

CN=fmdata-testclus,OU=fmdata,OU=Delegated,DC=netid,DC=washington,DC=edu

CN= is the computer name that will be added to the domain.  All of ours start with our designed OU name- (eg fmdata-)

OU= is here twice, notice.  The first is the name of our designated OU, the second one… just says Delegated and should be there for some reason.

DC= is here three times!  Our Domain Controller is netid.washington.edu, for some reason instead of periods you need to separate each URL part with another ,DC= if your domain controller was simple mydc.com, I think you would simply have two DC=’s, as in: DC=mydc, DC=com.  Exciting stuff, right?

Click Next, click Next

Click Finish

Click the Arrow to expand the item which is the dns name of your new cluster.

Click Nodes

Whoa, there are your two computers, each having the status “Up” …Great job!


SQL Diff Query Comparing Two Tables

In this example, we’re comparing the dataset on our local machine to one on Azure, so we need to use a linked server to connect Azure to the SQL install on our local machine.  You could easily adapt this technique to two similar tables in the same database however.

The Components

  1. We need a linked server, because the queries are all run locally but will need to both the remote Azure server, and the local server.
  2. We use a query to load a copy of the data we want to compare from Azure into a local temp table.
  3. We also use a query to load a copy of the data we want to compare from the local server into a local temp table.
  4. The queries only include data fields we want to compare. We’re stripping out things like id’s because we just want to see which rows have changed data. If we include id fields, then adding one row would cause hundreds to change.
  5. Finally is the actual “diff” query, which actually looks pretty simple.

Part 1: Drop If Exists

We want to drop the temp tables if they exist, so that we are sure we are comparing the most recent copies of data.

IF EXISTS(SELECT [name] FROM tempdb.sys.tables WHERE [name] like ‘#remote_temp%’) BEGIN
DROP TABLE #remote_temp;
END;
IF EXISTS(SELECT [name] FROM tempdb.sys.tables WHERE [name] like ‘#local_temp%’) BEGIN
DROP TABLE #local_temp;
END;

Part 2: Create Temp Tables

To make a temp table you need to define the data types for each of the columns.  Only make columns for the data fields you are comparing and selecting in the next part, not id columns.

CREATE TABLE #local_temp
(
Report_Name NVARCHAR(255),
Report_Label NVARCHAR(255),
…etc…
);

CREATE TABLE #remote_temp
(
Report_Name NVARCHAR(255),
Report_Label NVARCHAR(255),
…etc…
);

Part 3: Populate the Temp Tables

I’m not going to reproduce the queries here, since they are long and specific to my dataset.

The interesting bit here is that the queries are the same, except the FROM statement. When selecting from Azure, we are using our linked server code (Creating Linked Azure Server) so that we just need to refer to the table name with “azure.” in front, and we’ll select the data from Azure instead.

INSERT INTO #local_temp
SELECT
l_report.report_name AS Report_Name,
l_report.report_label AS Report_Label,
…etc…
FROM isnap.dbo.report AS l_report
WHERE blahblah = ‘blah’;

INSERT INTO #remote_temp
SELECT
r_report.report_name AS Report_Name,
r_report.report_label AS Report_Label,
…etc…
FROM azure.isnap.dbo.report AS r_report
WHERE blahblah = ‘blah’;

Part 4: The Diff Query

The query is simple, we just take:

  • The local data set minus the remote data set, and name it local (rows that are only on the local data set)
  • The remote data set minus the local data set, and name it remote (rows that are only on the remote data set)
  • and union those two things together so when we look at the results of the diff query:
    • If a record is deleted, a copy of the record will show up with Stage = Remote only, no row for Local
    • If a record is being added, a copy of the record will show up with Stage = Local only, no row for Remote
    • If a record is being updated, there will be two rows, one with Local (the new version) and one with Remove (the old version)
(SELECT
     'Local' as Stage, *
     FROM (
          (SELECT * FROM #local_temp)
          EXCEPT
          (SELECT * FROM #remote_temp)
     ) OnLocal)
UNION
(SELECT
     'Remote' as Stage, *
     FROM (
          (SELECT * FROM #remote_temp)
          EXCEPT
          (SELECT * FROM #local_temp)
     ) OnRemote)
ORDER BY Report_Name, Category_Name, Subcategory_Name, Description_Name, Subdescription_Name, Year_Name, Stage

Creating Linked Azure Server in Visual Studio SQL Server Express

I use Visual Studio to load data onto a SQL Server Express instance on my local PC. I believe that this SQL server installed with Visual Studio.

First, I used Microsoft SQL Server Management Studio to log in to my local instance with the following credentials. You should be able to run this SQL inside Visual Studio too, however.

Server name: (localdb)\Projects
Credentials: Windows authentication

Then execute the next two statements:

EXEC sp_addlinkedserver
@server=’Azure’,
@srvproduct=”,
@provider=’sqlncli’,
@datasrc='<remote db url>’,
@location=”,
@provstr=”,
@catalog='<a good name here, say: bob>’

and:

EXEC sp_addlinkedsrvlogin
@rmtsrvname=’Azure’,
@useself=’false’,
@rmtuser='<remote db username>@<remote db url>’,
@rmtpassword='<password>’
EXEC sp_serveroption ‘Azure’, ‘Collation Compatible’, true;

Now, if you have the isnap database selected on your local pc, you can issue this query:

select * from localtablename;

to query the table on the local pc.

and this query:

select * from azure.bob.dbo.remotetablename;

(where “bob” is the good name you assigned in the first statement you executed)  to query the table on azure!

Red/Yellow/Green Banding in Tableau

Lets say your boss wants to be able to switch on or off some banding to show if your metric is in the red/yellow/green, AND sometimes “good” (green) is up, and sometimes it’s down.

So, this:
banding1

or this:
banding2


Sample File

Download the extracted workbook Sample here:
Banding-Sample

Clicking on either “Equity Ratio” or “Expense Ratio” will take you to a worksheet with the associated data.

What we’ll need

We’re going to make reference lines based on data elements in the database, so that the banding is automatically configured by our data source. So we need to define the following elements in our source data:

  1. positive_direction_flag (in our case either “up” or “down.” Up indicates green on top.
  2. Ceiling (in our case, a percentage, but could be a value)
  3. Floor

We have set ceiling and floor to be boundaries where the ceiling is always indicates green… like this:

When the positive_direction_flag is “up”

green band here
Ceiling Line 1
yellow band here
Floor Line 1
red band here

When the positive_direction_flag is “down”

red band here
Floor Line 2
yellow band here
Ceiling Line 2
green band here


To pull this off, we’re going to need the following elements in Tableau:

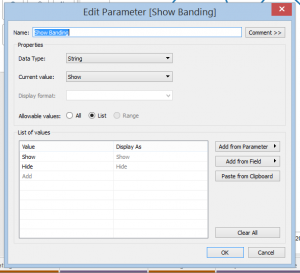
  1. A parameter to control showing/hiding banding
  2. Four calculated fields, one for each line we are making (shown above: Ceiling Line 1, Ceiling Line 2, Floor Line 1, Floor Line 2)
  3. Four reference lines, based on the values from the four calculated fields (but with the correct colors applied)

Create the Parameter

banding parameter

Create the Calculated Fields

Upper Line Green / Ceiling Line 1

I called Ceiling Line 1 in the breakout above “UpperLineGreen”  The formula is:

IIF([Show Banding]==’Show’,
IIF([Positive Direction Flag]==’up’, [Ceiling], null)
,null)

If the parameter equals “Show” AND positive_direction_flag (our database field) equals “Up” then return the value for ceiling (also from the database).

Bottom Line Red / Floor Line 1

IIF([Show Banding]==’Show’,
IIF([Positive Direction Flag]==’up’, [Floor], null)
,null)

Upper Line Red / Floor Line 2

IIF([Show Banding]==’Show’,
IIF([Positive Direction Flag]==’Down’, [Floor], null)
,null)

Note how the value is the one for floor even though it’s the line on the top!

Bottom Line Green / Ceiling Line 2

IIF([Show Banding]==’Show’,
IIF([Positive Direction Flag]==’Down’, [Ceiling], null)
,null)

Create the Reference Lines

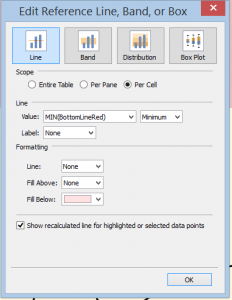
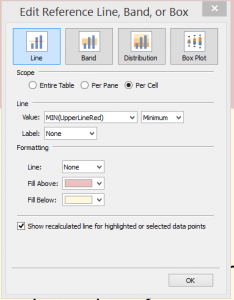
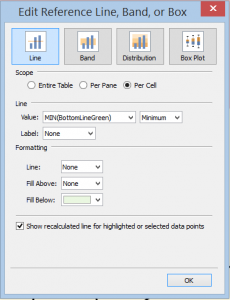
First off, since we want to use our calculated fields for the reference lines, so they need to be added to the worksheet.  Then we create a reference line for each calculated field, with the color bands applied to the reference lines.

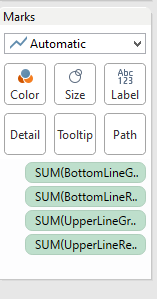
  1. Drag each of the four calculated fields to the white part of the Marks pane
    sumonmarks
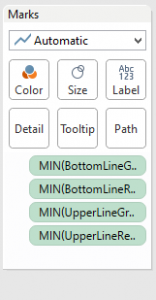
  2. Notice that they say SUM… we have this data element on every associated date/value pair in our dataset, so summing the values up is no good.  Click the down arrow to the right of each field, change the measure to minimum.
    minonmarks
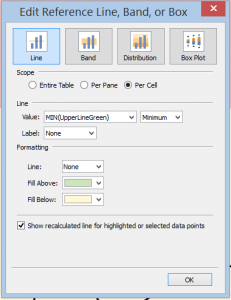
  3. Right click on the y-axis and click “Add Reference Line”
    1. Be sure to add the lines in the order presented below.
    2. Choose Line (you may think you need “Band” but you’d be wrong!)
    3. I used scope per cell.
    4. Value Min(UpperLineGreen) and Minimum.
    5. Fill above with green and below with yellow.
    6. Follow the screen captures below to add the corresponding reference lines.
Upper Reference Line Green

upperlinegreenreferenceline

Bottom Reference Line Red

bottomlineredreferenceline

Upper Reference Line Red

upperlineredreferenceline

Bottom Reference Line Green

bottomlinegreenreferenceline

One last trick

In this example I’m using a dual axis, one axis to display each ratio.  What you’ll see sometimes is “xx nulls” at the bottom of the screen:

nulls

To hide this from display:

  1. Right click on the y-axis
  2. Click Format…
  3. Make sure you are on the Pane tab
  4. Under Special Values (eg. NULL)
  5. Change Marks: to Hide (Connect Lines)
  6. Note that if you are using dual axis, you need to do this for each axis.

That should do it!

Convert a tab-delimited file to SQL inserts

This is useful when I’m migrating data from one system to another. It uses the quotesplit code I talked about here: Parsing CSV data files with PHP, using quotesplit.

You want your source file to be tab delimited, with the header row containing the database field names that you are going to load each piece of data into. I use Excel to prepare the file. Then you run this file using the PHP interpreter at the console, and redirect the output to a .sql file. In the Mysql console, source your new .sql file. For convienience, I’ve attached the file tabdelim-to-sqlinsert.zip

You can use this for comma-separated or pipe-separated or whatever as well, if you change t in your call to quotesplit.

< ?php
  ini_set('display_errors',1); 
  error_reporting(E_ALL);

  # User config variables:
  $Filename = 'sourcedata-tabdelim-file.txt';
  $dbname = 'databasename';


  ####################################################
  function format($in)
  {
    $out = trim($in);
    if (($out == '') || ($out == 'NULL')) {
      return 'NULL';
    } elseif (preg_match ('/bd{1,2}/d{1,2}/d{4}b/', $out)) {
      # incorrectly formatted date detected (ie 10/31/2012 or 12/31/9999)

      $datetimeparts = explode(' ', $out);
      $dateparts = explode('/', $datetimeparts[0]); # consider date part only
      $out = $dateparts[2] . '-' . $dateparts[0] . '-' . $dateparts[1];
    }
    return "'" . $out . "'";
  }
  #######################################
  function RemoveArrayElement($array, $removeKey)
  {
    unset($array[$removeKey]);
      foreach ($array as $value)
        $return[] = $value;
    return ($return);
  }
  #######################################
  function DealWithMultipleSurroundingQuotes($splitter, &$getstrings)
  {
   for($x = 0; $x < count($getstrings); $x += 2) //foreach even key
   {
      if (!stristr($getstrings[$x], $splitter)) //if splitter is not in row
      {
         if (trim($getstrings[$x-1]) == '') //if previous row is empty
            //remove previous row
            $getstrings = RemoveArrayElement($getstrings, $x-1);
         else
            //remove current row
            $getstrings = RemoveArrayElement($getstrings, $x);

         return false;
      }
   }
   return true; //Function finished successfully!
  }
  #######################################
  function quotesplit( $splitter=',', $s, $restore_quotes=false )
  {
   # First step is to split it up into the bits that are surrounded by quotes
   # and the bits that aren't. Adding the delimiter to the ends simplifies
   # the logic further down

   $getstrings = explode('"', $splitter . $s . $splitter);

   while(!DealWithMultipleSurroundingQuotes($splitter, $getstrings));

   # $instring toggles so we know if we are in a quoted string or not
   $delimlen = strlen($splitter);
   $instring = 0;

   while (list($arg, $val) = each($getstrings))
   {
      if ($instring == 1)
      {
         if($restore_quotes)
         {
            # Add string with quotes to the previous value in the array
            $result[count($result)-1] = $result[count($result)-1]. '"' . addslashes(trim($val)) . '"';
         } else {
            # Add the whole string, untouched to the array
            $result[count($result)-1] = addslashes(trim($val));
         }
         $instring = 0;
      } else {
         # Break up the string according to the delimiter character
         # Each string has extraneous delimiters around it (inc the ones
         #  we added above), so they need to be stripped off
         $temparray = explode($splitter, substr($val, $delimlen, strlen($val)-$delimlen-$delimlen+1 ) );
         while(list($iarg, $ival) = each($temparray))
            $result[] = addslashes(trim($ival));
         $instring = 1;
      }
   }
   return $result;
  }

  ####################################################
  $file = fopen($Filename, 'r');
  if($file == false)
  {
    print 'Error in opening file';
    exit();
  }
  $Filesize = filesize($Filename);
  $filerow = fgets($file, $Filesize);
  $headerrow = quotesplit("t", $filerow);
  $numcols = 0;

  while($filerow = fgets($file, $Filesize))
  {
    $row = quotesplit("t", $filerow);
    print 'INSERT INTO `' . $dbname . '` (';
    $first = true;
    foreach ($headerrow as $field)
    {
      if ($field == '') {
        # Do nothing
      } elseif ($first) {
        print '`' . $field . '`';
        $first = false;
        $numcols+=1;
      } else {
        print ', `' . $field . '`';
        $numcols+=1;
      }
    }
    print ') VALUES (';
    for ($i=0; $i

To use PhpStorm with Ubuntu Vagrant install Xdebug for PHP

How the Vagrant box is configured

To be able to step through code using the IDE of our choice, we need to install Xdebug onto our Vagrant Box.

Good instructions here: http://ubuntuforums.org/showthread.php?t=525257

Updates to the Provisioning Script:

Install php5-dev php-pear using apt-get, install xdebug using pecl, creating a properly owned folder in /var/log to store the xdebug log file.

Added to apt-get packages list:

php5-dev #needed for xdebug
php-pear #needed for xdebug

Also added:

echo "Creating xdebug log directory: /var/log/xdebug"
mkdir /var/log/xdebug
echo "Changing xdebug log directory owner to www-data"
chown www-data:www-data /var/log/xdebug

echo "Installing xdebug"
pecl install xdebug

Needed to add the following to the php.ini to configure it for xdebug:

;;;;;;;;;;;;;;;;;;;;;;;;;;
; Added to enable Xdebug ;
;;;;;;;;;;;;;;;;;;;;;;;;;;
; use the following command to find xdebug.so:
; find / -name 'xdebug.so' 2> /dev/null
zend_extension="/usr/lib/php5/20100525/xdebug.so"
xdebug.default_enable = 1
xdebug.idekey = "vagrant"
xdebug.remote_enable = 1
xdebug.remote_autostart = 0
xdebug.remote_port = 9000
xdebug.remote_handler=dbgp
xdebug.remote_log="/var/log/xdebug/xdebug.log"
xdebug.remote_host=10.0.2.2 ; IDE-Environments IP, from vagrant box.

How to configure your IDE

Your IDE needs to listen for connections on port 9000.

Your IDE needs to know the host IP as well as the path the files reside in on the server.

Your IDE (or you, via a url) need to start and stop xdebug.

Configuring PHPStorm

Create Project

First, create a new project. If you’re using SVN, configure PhpStorm to use SVN and check out the project into a new folder.

Add Remote Server

File -> Settings

Under Project Settings [project-name] on the left, browse to PHP -> Servers

Click the green +

Name: 192.168.50.4

Host: 192.168.50.4

Port: 80

Debugger: Xdebug

Check “Use path mappings (select if the server is remote or symlinks are used)”

Under File/Directory on the left, Browse to Project Files -> checkoutdirwwwproject-name

Next to the www directory, on the right under Absolute path on the server, enter: /data/www (or wherever your files are stored on the vagrant box)

Click OK

Add Debug Config

Under the Run dropdown menu, click Edit Configurations…

Click PHP Web Application, then click the green +

Name: vagrant

Server: 192.168.50.4 should be in the dropdown

Start URL: /

Browser: Chrome

Start Listening for Debug Connections

There’s a telephone icon in the icon bar, with a very small green bug and a red circle with a line through it.
Hovering over it, it will say Start Listen PHP Debug Connections
Clicking that will start the listener.

OR

Click Run -> Start Listen PHP Debug Connections

Start Debugger

Make sure vagrant is selected in the drop-down next to the green play arrow icon in the header.

Click the green bug icon in the header (hover text is Debug ‘vagrant’ Shift+F9)

OR

Click Run -> Debug vagrant

A new browser window will open with a url something like: “http://192.168.50.4/?XDEBUG_SESSION_START=15172”

If you have a breakpoint defined, the browser will appear to ‘hang’ or ‘spin’ or ‘load’ forever. It’s waiting for the IDE to give it the go signal. Press F9 OR click Run -> Resume Program to finish loading the page.

Debugging / Stepping through the program execution

First off, you need to have a breakpoint set, or you will not stop program execution, and so will not have the opportunity to utilize the debugger.

Set a breakpoint by clicking in the left margin right next to the code to put a red dot there.

Now click a link on the application in the browser, and the server will execute all the code up to the red dot, and stop, waiting for a command.

Pressing F7 for Step into will make sure to execute every single line of code

Pressing F8 for Step over will go to the next line but basically never leave the current file: it will not dive down into function calls. This is useful for skipping stuff you know you don’t care about.

Stopping the Debugger

Ctrl+F2,

Run -> Stop, or

Clicking the red square in the debug window all stop the PhpStorm debugger.

However, if you click a link on the browser it will start right back up again. It needs to send a header to the xdebug server and… it doesn’t appear to. We can send that ourselves.

1) Click Stop

2) Follow this link: http://192.168.50.4/?XDEBUG_SESSION_STOP

Send email from PHP to a log file instead of sendmail

Say you want to test email sent from a PHP application on your development environment, and you don’t want to set up sendmail. You can write a little PHP script to replace the sendmail call!

First, create the following file: /usr/local/bin/phpsendmail


#!/usr/bin/php
<?php
	$logfile = '/data/www/ap/sent-mail.htm';
	//* Get the email content
	$log_output = "<p>****" . date('Y-m-d H:i:s') . "****</p>rn";
	$handle = fopen('php://stdin', 'r');
	$count = 0;
	while(!feof($handle)) 
	{
		$count++;
		$buffer = trim(fgets($handle));
		if ($count <= 12) # Output header information
			$log_output .= $count . ": " . $buffer . "<br>rn";
		else # Output body
			$log_output .= $buffer . "rn";
	}
	//* Write the log
	file_put_contents($logfile, $log_output, FILE_APPEND);
?>

Then, edit your php.ini (mine is here: /etc/php5/apache2/php.ini) so that the mail portion of the file looks like this (note the commented-out lines and the sendmail_path):


[mail function]
; For Win32 only.
; http://php.net/smtp
; SMTP = localhost
; http://php.net/smtp-port
; smtp_port = 25

; For Win32 only.
; http://php.net/sendmail-from
; sendmail_from = me@example.com

; For Unix only.  You may supply arguments as well (default: "sendmail -t -i").
; http://php.net/sendmail-path
; sendmail_path =
sendmail_path = /usr/local/bin/phpsendmail

Restart apache (mine restarts with: sudo /etc/init.d/apache2 restart)

Now send a test email using your php script. If you want, you can create this file in your www root and run it:

<?php
  $name = "From PHP"; //senders name 
  $email = "testfromaddress@domain.edu"; //senders e-mail adress 
  $recipient = "testsenttoaddress@domain.edu"; //recipient 
  $mail_body = "The text for the mail...rnhi... this is the second line of the body text.rnThirdrnand fourth lines."; //mail body 
  $subject = "Subject for reviever"; //subject 
  $header = "From: ". $name . " <" . $email . ">rn"; //optional headerfields 

  echo date('h:i:s A') . ' *** ';
  if (mail($recipient, $subject, $mail_body, $header) === true)
    echo 'Mail sent successfully.'; 
  else
    echo 'Mail could not be sent.';
?>


Now you should have a sent-mail.htm in your www root! Browse to it with your web browser!

The following script and idea is modified from this website: http://www.howtoforge.com/how-to-log-emails-sent-with-phps-mail-function-to-detect-form-spam

Set MySQL @variable for hostname user grants

The user grant syntax in mysql is problematic if you want to use a variable to set the hostname when you are creating users in a mysql script. The @ notation means the start of a variable normally, but it’s also used in the mysql grants… so if you try to do this:

SET @hostname='localhost';
GRANT SELECT, SHOW VIEW ON *.* TO 'username'@'@hostname' IDENTIFIED BY 'pass';

You get the error:

Lookup Error - MySQL Database Error: Malformed hostname (illegal symbol: '@')

Or if you take the single quotes out, you just get a syntax error.

The solution is to use a placeholder when you do the create user grants, then later replace all instances of the placeholder with the variable.

/* uncomment to set appropriate environment */
SET @hostname='localhost'; /* development */
/* SET @hostname='testing.hostname.com'; */
/* SET @hostname='production.hostname.com'; */

GRANT SELECT ON db_name.table_name TO 'username'@'env' IDENTIFIED BY 'pass';
GRANT SELECT, INSERT ON db_name.* TO 'username2'@'env' IDENTIFIED BY 'pass';
GRANT SELECT ON *.* TO 'username3'@'env' IDENTIFIED BY 'pass';
/* ... */

UPDATE mysql.user SET host = @hostname WHERE host = 'env';
UPDATE mysql.db SET host = @hostname WHERE host = 'env';
UPDATE mysql.tables_priv SET host = @hostname WHERE host = 'env';
FLUSH PRIVILEGES;

Remap Caps Lock key to Ctrl in Windows 7

I love having Control on the home row. To turn your (frankly useless and annoying) caps lock key into the ctrl key, browse to this key in regedit:

HKEY_LOCAL_MACHINESYSTEMCurrentControlSetControlKeyboard Layout

Set it to this Hex code:

00,00,00,00,00,00,00,00,02,00,00,00,1d,00,3a,00,00,00,00,00

OR use the registry modification files they made here:
http://www.howtogeek.com/howto/windows-vista/disable-caps-lock-key-in-windows-vista/
(look for the Download Keyboard Mappings Registry Tweaks link)