This tutorial was developed and written by Abel Debela (Data Engineer / UW Tacoma MSBA Student) – https://www.linkedin.com/in/abelchaka/
As we all know, moving large amounts of data from one place to another can be an easy but also risky task. If you underestimate this task, you can lose, de-transform or corrupt your data. After that there is no point to continue working on a data analytics project that contains messy data. In this tutorial, I would like to share a few simple steps to move your data from on-premise SQL Server database to Azure SQL database based on my personal experience.
As part of our Master of Science in Business Analytics (MSBA) Program, my team is working on a 12-month long Applied Project with an organization to improve their processes with data and analytics. During this project, our client gave us access to their operational database that needs to be moved to a cloud data warehouse to find hidden patterns to address one of their business problems.
Our team has received access to our client’s SQL server database and this document explains how we deploy the database to a UW-provisioned Azure-managed SQL Server database. Before you start the following steps, make sure that you have admin access to your local SQL Server database and have SQL Server Management Studio (SSMS) installed in your computer.
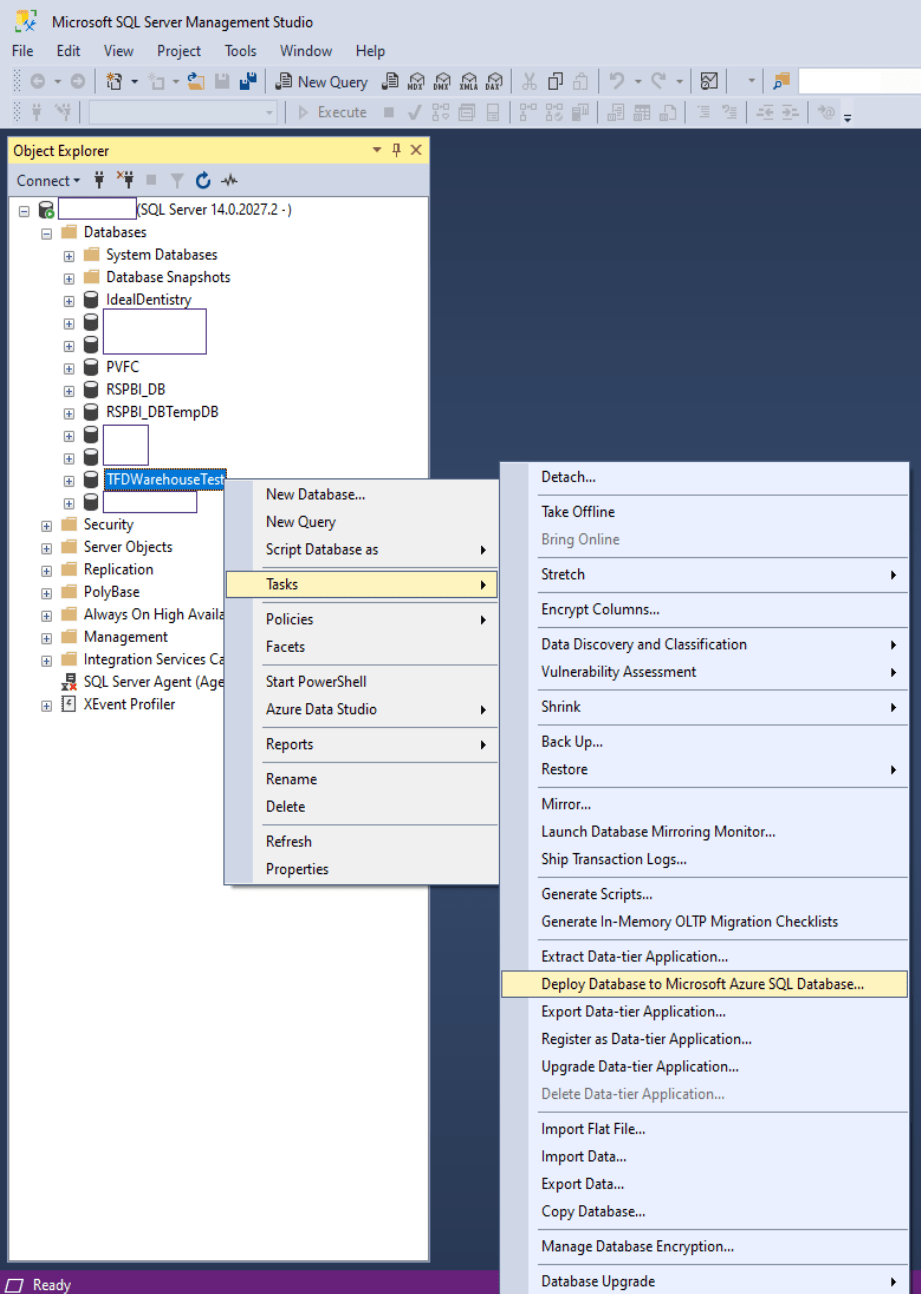
Once you connect to your on-premise SQL Server database from SSMS, right click on the database that you would like to migrate to Azure SQL Server.
Then select Tasks — > and Deploy Database to Microsoft Azure SQL Database. (See screen capture below)…
Once you connect to your local server and select deployment task, you will see the following screen…

Click Next to go to the next screen.
You will be provided with Azure database size & edition options. I picked Basic, as the database we are deploying is less than 2GB. Please see Microsoft’s documentation for more information on different Azure SQL Server pricing options.
Once you select the database edition and size option, click Next button to continue deployment.
This section prepares the SSIS BACPAC file that contains the metadata and data from your local on-prem database. The deployment process saves this file into the cloud blob storage or in local storage in an on-prem location for later import back into an Azure SQL managed instance.
Click Finish button to go to the next screen…

The deployment wizard validates both the on-prem and cloud schema before activating the Next button. Click the Next button after the two databases are validated.

Depending on the size of your database and the bandwidth of your computer network, this process might take a few minutes to hours. If the process is successful, you will see Operation Complete sign and you can go ahead click the close button. If the process failed, you will see Operation Failed sign and you can click on the error detail to see what caused the error.
In our case, we had local SQL Server authenticated user accounts attached. The Azure SQL Server refused to create users in Azure as the server that we are using to deploy the database was configured to work with Azure Active Directory Service (AADS). We removed the user accounts from the on-prem account and restarted the deployment wizard which then successfully migrated our database to the Azure cloud.
See the following two screens that depict failed and successful deployments…


Once you finish this process, connect to the Azure managed SQL Server database from SSMS or Azure Studio and see if the database is fully deployed. Depending on your requirement, you may need to create additional new users and assign database roles in order to let other users read and write into this database.
Now you can connect your data in a cloud database and start your business analytics journey with lots of big data. So what do you think? Have you had any data move-related problems during your business analytics journey?

This tutorial was developed and written by Abel Debela (Data Engineer) – https://www.linkedin.com/in/abelchaka/